
It's been a bit quiet here, not on purpose. I had a bit of a set-back. On Tuesday, I had stomach pains. That should have been the first clue. Wednesday, the pain hadn't gone away. I called my husband away from work to take me to the Clinic.
I had high white blood cell count - an infection of some kind. After a CT scan (I'll spare the details) I had an emergency appendectomy late Wednesday night. I'm good, healthy, and strong. My pets have snuggled in. My husband has taken time off work to care for me. The kids are quiet - ish. I have some time on my hands. The boredom will get to me first.
As for Un-Finished Projects, I've completed my woven blanket. I put the satin binding on and added a nalbinding edge to the sides. I'll post photos shortly and describe the process. It does make a nice finished edge when one isn't there already. I used the samenalbinding stitch as the Toothbrush rag rug.
I knitted another cuddly bunny blanket. It's a Lion Brand bunny blankie out of handspun alpaca. I modified the pattern a bit. I don't like the directions. Because I am more experienced as a knitter, I do feel comfortable changing things.
I watched Margaret Stove's video to prepare locks and spin lace.
I'll finish threading my loom later. Maybe the loom faeries will do it for me...
Monday, January 31, 2011

Friday, January 14, 2011
New Toothbrush Needles
I went to Dollar Tree and found they had 5 packs of toothbrushes with the holes in the end. Now that I have a few made, I am happy with the effect they have on my rug making. The needle slides through the fabric easily without binding.

Modifying these is easy if you have the tools. Luckily, I have them here at the house. If you don't, you may consider looking around your neighborhood and asking for some help. You may barter something for use of the tools (scarf, hat, mittens)

Yes, this is one of my cats. She makes sure my rugs and fabric strips don't float away. She helps my needles go through the holes or loops depending on what technique I'm using.

Modifying these is easy if you have the tools. Luckily, I have them here at the house. If you don't, you may consider looking around your neighborhood and asking for some help. You may barter something for use of the tools (scarf, hat, mittens)
- I used my bolt cutters to cut off the top. This did a better job than tin snips or any other cutter. The plastic didn't shatter. A plus in my book.
- I took my file filed the tip down over the garbage can. I'd stop periodically to check my progress. I wanted a more pencil-like pointy tip so I filed at an acute angle. It took a bit longer, but was worth it.
- I took some 150 grit sand paper and sanded down the edges, rounding down the edges. Don't forget to sand down the butt end as well. Your fingers will thank you.
- I used some 320 grit sand paper to finish the process and get off all the rasp marks. The end product looks pretty good. I have 3 done so far.

Yes, this is one of my cats. She makes sure my rugs and fabric strips don't float away. She helps my needles go through the holes or loops depending on what technique I'm using.
Thursday, January 6, 2011
Next Get Together - Learn Toothbrush Rag Rugs
We’re looking at January 15th as our next get together at my house. Let’s start around 10’ish. Toothbrush Rag Rugs don't take long to understand. The challenge is starting. The stitches are repetitive. Don't worry, you'll get it.
We’ll make “needles” made from Popsicle sticks unless you want to go online and buy one. Just Google Toothbrush Needles and you will find some. They cost somewhere around $4-7. You’ll need to bring your own cloth. I used some old sheets I ripped up into strips (kids helped – it was fun). You can use anything: old t-shirts, dress shirts, blue jeans, silks, leather (don’t ask me how), any material. Hit sales or the 2nd Hand Stores. How wide? Well, I measured with my first 2 fingers. For me that’s about 1½”. A 2” strip will get you a 7/8” stitch. A 1” strip will get you a 5/8” stitch: roughly ½ ratio.
We’ll use Amish knots to connect the strips so you won't need to join the lengths with anything. If you want to put slits in the ends you can – you don’t have to. To do so, just fold over the end about a thumb width. Snip a bit lengthwise down the center so there is a slit. Depending on the thickness of the fabric, I do two ends at once and then wind them onto a ball to manage them better. My cat loves this craft. If you don’t want to do this, we can do it here. Some people like to do prep work, some don’t. I’m about ½ and ½. My kids helped quite a bit so I did more prep work, faster.
This is a kind of nalbinding. It passes the time. I’m making one for my dad’s birthday right now.

Friday, December 31, 2010
Toothbrush Rag Rugs - Denise
I'm making progress. I decided to make my own needle. I read a post from BellWether that she had used a Popsicle stick. So I thought, "Why Not!"
I scored one from my daughter's DayCare center (Thanks TLC Center) and filed and sanded it to shape. I used my Yankee driller to make the hole. I used paraffin wax (that's what I had on hand) to seal it so it wouldn't catch on the flannel sheet strips. I do have a beeswax candle somewhere in the house. It's somewhere really safe right now.

That done, I find that it really is easier to use a needle that a bodkin. The metal hoop on the bodkin kept catching in the loops. Now, I'm going much faster.

This is actually fun! Looking at the photo, I need to vary the placement of my color changes to hide them a bit better.
Oh, to make the needle, I found the center line first. I measured down from the tip about 1/2". I use my file to roughly shape the lines and round things out. I sanded out the roughness with 200 grit sandpaper. I took my Yankee driller and drilled out the back end 3/8" up. The hole is about 3'8" - 1'2" long. I sanded it smooth with folded paper.
I scored one from my daughter's DayCare center (Thanks TLC Center) and filed and sanded it to shape. I used my Yankee driller to make the hole. I used paraffin wax (that's what I had on hand) to seal it so it wouldn't catch on the flannel sheet strips. I do have a beeswax candle somewhere in the house. It's somewhere really safe right now.

That done, I find that it really is easier to use a needle that a bodkin. The metal hoop on the bodkin kept catching in the loops. Now, I'm going much faster.

This is actually fun! Looking at the photo, I need to vary the placement of my color changes to hide them a bit better.
Oh, to make the needle, I found the center line first. I measured down from the tip about 1/2". I use my file to roughly shape the lines and round things out. I sanded out the roughness with 200 grit sandpaper. I took my Yankee driller and drilled out the back end 3/8" up. The hole is about 3'8" - 1'2" long. I sanded it smooth with folded paper.
Wednesday, December 29, 2010
Toothbrush Rag Rugs - Denise
I'm on a learning curve here. I've learned that I don't need a toothbrush to work my Toothbrush rug. I'm using a bodkin that I bought at JoAnne Fabric for $1.74. I'll try a Popsicle stick later.
I've learned by trial and error how to do the stitches. I have a few videos to list to help out.
Here's one for the basic beginning steps. It's a YouTube video that I can't embed here.
The next is this for the stitches. This guy is good is examples, but does ramble a bit.
After you get going, the stitches are a bit complicated to visualize. I was stumped and made one heck of an ugly rug. Then I got it after watching some videos. If I pick up the proper stitches in the proper order, then I'll get the braided effect.
I've learned by trial and error how to do the stitches. I have a few videos to list to help out.
Here's one for the basic beginning steps. It's a YouTube video that I can't embed here.
The next is this for the stitches. This guy is good is examples, but does ramble a bit.
After you get going, the stitches are a bit complicated to visualize. I was stumped and made one heck of an ugly rug. Then I got it after watching some videos. If I pick up the proper stitches in the proper order, then I'll get the braided effect.

Increasing is a puzzler. Some say to increase here and there. Others suggest at certain points. The best way I've found it to let the rug do the talking. It was mentioned to look for the 90 degree angle. What in the world were they talking about? Then as I turned the corner of my rug, I saw it. See the photo below.

MATH AND LOGIC
So far, I’ve found information about buying fabric. You ready? BellaOnline describes the process and the ratios.
1/2# will make one foot squared
1# = 4 yards of cloth (I’m guessing of 36”).
12 yards of cloth will make a 2’x3’ rug
2” strip = 7/8” stitch
1” strip = 1/2” stitch
Math: 2’x3’=6 ft squared. 6 x 1/2 = 3#. 3x4=12 yards
Other math and logic
-
Increase on the 1st curve twice (if it works that way). The next 3x. Do so several times. You may need to increase 4, 5, or 6x. Look to where there is a gap. Fill the gap.
-
For an oval rug, make the braid or chain stitch beginning 1/3 as long intended total. 12” for a 36”x24” rug.
-
If your rug cups, add in stitches at strategic places.
Tuesday, December 28, 2010
Homemade Raddle - Denise
Here we go. After my adventure (fiasco) using sectional warp with my camp towels, I discovered that irregular stripes were probably easier and wiser to do with a warping board and then warped using a raddle.
I didn't have one. I looked up on some sites and found that ones for my loom would cost around $50 + s/h. I searched some sites and found that I could indeed make one for myself.
I looked up and found that 1x2 pine lumber is about $5 for 86". Use a soft wood so it doesn't split when nailing. Otherwise you will need to drill a small starter hole.That would give me 2 raddles of 43" for my 36" loom. That puts 2" beyond the desired loom width to clamp. The finishing nails I need are 1-1/2" bright finishing nails. I could buy 1000 or a smaller assorted box for $2.99.
I don't like sanding so I painted mine with leftover satin paint, 2-3 coats. I measured roughly 1/2 way down the good side and drew a light line. I then made 1" marks for where the nails would go starting with the center and moving outward from both sides.

I then started at one end and carefully hammered the nails in. On the second one I left the very end one off. I needed something to clamp, logically. I'll go back and pull the end nails later.

I only hit my thumb once when distracted. I painted the center with fingernail polish. If desired, I could drill a hole in the end and put a eye bolt in so I can hang it from the wall when not in use.

This won't snag on yarns. I'll keep you updated on how it works.
I didn't have one. I looked up on some sites and found that ones for my loom would cost around $50 + s/h. I searched some sites and found that I could indeed make one for myself.
I looked up and found that 1x2 pine lumber is about $5 for 86". Use a soft wood so it doesn't split when nailing. Otherwise you will need to drill a small starter hole.That would give me 2 raddles of 43" for my 36" loom. That puts 2" beyond the desired loom width to clamp. The finishing nails I need are 1-1/2" bright finishing nails. I could buy 1000 or a smaller assorted box for $2.99.
I don't like sanding so I painted mine with leftover satin paint, 2-3 coats. I measured roughly 1/2 way down the good side and drew a light line. I then made 1" marks for where the nails would go starting with the center and moving outward from both sides.

I then started at one end and carefully hammered the nails in. On the second one I left the very end one off. I needed something to clamp, logically. I'll go back and pull the end nails later.

I only hit my thumb once when distracted. I painted the center with fingernail polish. If desired, I could drill a hole in the end and put a eye bolt in so I can hang it from the wall when not in use.

This won't snag on yarns. I'll keep you updated on how it works.
Wednesday, December 8, 2010
Newest Projects - Blanket Undulating Twill (Denise)

Some of you may remember my spun Columbia. I’ve dyed it navy blue for the warp and mauve for the weft. I’ve learned to gently set the weft in place to get the pattern to properly show itself. When done, I’ll cut and sew the two halves together for a nice blanket. I'll decide how to finish and enclose the ends when the time comes.
In all honesty, I made a gaff when dyeing. I forgot to loosen all the ties on the woodrose. I also didn’t move it around in the pot as much as I should have. Readjusting the yarn in the pot makes sure the dyes are spread out for even distribution. Now I have slightly space-dyed woodrose. I didn’t bother redyeing because it would look worse. I remembered my mistakes for the navy and everything turned out just fine. As it is, it has grown on me - 5+ yards of cloth will do that.
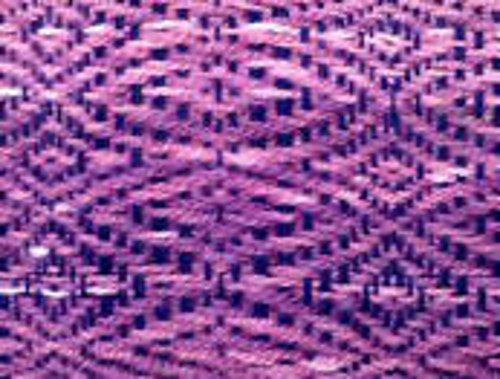
The dyes are Cushings this time. The dyes are consistent and fesh. The mistakes are mine. Here's the color card.
Monday, November 29, 2010
Lunch Out - Lisa, Dawn and Denise

We decided to meet for lunch during the rushing about of the season. Chilli's was close. Coupon's were at hand.
We solved the world's problems, as always. Solved our problems: more fiber. We laughed and had a good time. We tried not to tease the waitress too much.
Considering it was about -20 degrees below F, we survived the drive, meal and trip back. We all hunkered down at jobs and home. We had a "heat wave". What we call a chinook. A warm south-western wind that melts the snow away. Now it's only snowy and 15 degrees out. Pleasant in comparison.
Sunday, November 14, 2010
Making Your Acid Dyes Work For You - Denise
I'm a member of Dyehappy (Yahoo). The daily discussions and posts have improved my understanding of the different dyes and their preferred uses. I'm no expert, but I've gone from "What?" to "Got it."
In a post the other day one person asked about the amount of vinegar to use in preparing a dye bath for dyeing wool. Her concern was since the recipe was for American vinegar (5%) and she had (I guess) German (she referred to vinegard at 35%). She wanted to know know how much to use.
To sum up, poster Ian Bowers (from the UK) explained the exact amount depends on pH level. Now, I can see everyone's heart's begin to palpitate and palms begin to sweat. This isn't going to be a science class...not really. With M. Bower's help, I now understand how managing the dyebath will help me get better, more consistent results in dyeing. The amount of fiber and strength of acid is of very little importance. (Just go with me here - I've had my dye strike too fast with too much acid.) With acid dyes, maintaining the acid will allow the dye to strike at a consistent and controlled rate. I won't waste my resources.
Lets begin.
In a post the other day one person asked about the amount of vinegar to use in preparing a dye bath for dyeing wool. Her concern was since the recipe was for American vinegar (5%) and she had (I guess) German (she referred to vinegard at 35%). She wanted to know know how much to use.
To sum up, poster Ian Bowers (from the UK) explained the exact amount depends on pH level. Now, I can see everyone's heart's begin to palpitate and palms begin to sweat. This isn't going to be a science class...not really. With M. Bower's help, I now understand how managing the dyebath will help me get better, more consistent results in dyeing. The amount of fiber and strength of acid is of very little importance. (Just go with me here - I've had my dye strike too fast with too much acid.) With acid dyes, maintaining the acid will allow the dye to strike at a consistent and controlled rate. I won't waste my resources.
Lets begin.
- Get some pH strips. You will need those. They should be available where you buy your pool or spa chemicals. Sometimes even at (cringe) Wal-mart.
- You need to check the pH of the water you use. M. Bowers' place of work has pH that varies from 7.5-9.3 in one day. Mine is processed river water. You can use filtered water.
- M. Bowers says, "The only competent way is to place the fibre in the bath and then add vinegar (or citric acid if cost is no object), aim for pH around 6 (except for some Jacquard dyes which are strong acid dyes and require a pH around 4. Ideally check the pH at 'half-time' and adjust with more acid if necessary. As an aside, brown vinegar does not stain the fibre, and is cheaper.
Monday, November 1, 2010
New Spool Rack (Denise)
I've been waiting for my dad to make me a spool rack. For a variety of reasons, the project has been put off. Well, I got tired of waiting since my loom was sitting empty and was ready for my next project. I needed a spool rack to use with my sectional warp.

I made my own spool rack out PVC pipe. This is functional, and almost literate as a weaving tool.
To make this project, you'll need the following:
It's about 41" long. I measured every 4" (centered 2" for the holes) along the sides on an extra piece as a template so the sides would be even. I drilled holes on one side and a slot on the other. Again this isn't exact or perfect. It will do, for now.

The 3/16" gauge round wire comes in 36" lengths. I could get 2 sections. So for 40 spools, that's 5 wires cut roughly in half and trimmed to fit.
The last step was to drill the 1/2" PVC pipe to the 3/4" pipe using the self tapping screws as a support.
Good luck!

I made my own spool rack out PVC pipe. This is functional, and almost literate as a weaving tool.
To make this project, you'll need the following:
- 4 - 90 degree elbows
- 2 - 10' lengths of 3/4" PVC pipe (I found some pre-cut lengths so I only had to buy one)
- 2 - 1/2" pipe about 2' long (I found some pre-cut lengths)
- PVC pipe cutters (I used the ratcheting kind)
- tape measure
- permanent marker
- 3/16" round wire (for the spools)
- drill and drill bit larger than 3/16"
- bolt cutters (cut the wire)
- 2 self tapping screws 1-1/4" long
It's about 41" long. I measured every 4" (centered 2" for the holes) along the sides on an extra piece as a template so the sides would be even. I drilled holes on one side and a slot on the other. Again this isn't exact or perfect. It will do, for now.

The 3/16" gauge round wire comes in 36" lengths. I could get 2 sections. So for 40 spools, that's 5 wires cut roughly in half and trimmed to fit.
The last step was to drill the 1/2" PVC pipe to the 3/4" pipe using the self tapping screws as a support.
Good luck!
Sunday, October 10, 2010
First Overshot

Thank you to Lisa and Dawn for forcing me into learning woven overshot.
I sat down with Lisa and threaded the table loom. Later I fixed the crossed threads. With Dawn, we went through how to read the pattern. It would have been easier on the floor loom. With the table loom we had to push down individual levers each time rather than have grouped patterns set up on the foot treadles. Ah well, such is life.
Tuesday, October 5, 2010

Tuesday, September 21, 2010

Friday, September 17, 2010
Channel Island Cast-On (Denise)
For something different, why not try a sturdy, stretchy cast-on. The Channel Island Cast-on can be used for socks, sleeves, hats, rib edges, or anything that needs a some give, yet strength.
Originally these were used on gansey sweaters, fishermen sweaters. Because it uses 3 strands of yarn (don't be frightened off by this) it is strong.
It uses a thumb wrap and a yarn over.
Here's the video clip how to do it.
Originally these were used on gansey sweaters, fishermen sweaters. Because it uses 3 strands of yarn (don't be frightened off by this) it is strong.
It uses a thumb wrap and a yarn over.
Here's the video clip how to do it.
Monday, September 13, 2010
Newest Projects (Denise)
I've been busy, I guess. Now that kids are off to school, time has readjusted. I've been working on some woven cotton camp towels. It's coming along nicely.

I tried needle felting for the first time. I would recommend making sure your tetanus shot is updated. Considering how sharp the needles are, it is pushing through wool (I don't care how clean you think it is, there will be something in it.) and you can get something under your skin. I've jabbed myself several times, with only one bloodletting. I made a primitive sheep and a heart.

After reading up on all the "form" used to make the objects, I decided to use a cookie cutter from my stash. My DH didn't know what the sheep was at first. My son did. You be the judge.


I tried needle felting for the first time. I would recommend making sure your tetanus shot is updated. Considering how sharp the needles are, it is pushing through wool (I don't care how clean you think it is, there will be something in it.) and you can get something under your skin. I've jabbed myself several times, with only one bloodletting. I made a primitive sheep and a heart.

After reading up on all the "form" used to make the objects, I decided to use a cookie cutter from my stash. My DH didn't know what the sheep was at first. My son did. You be the judge.

Thursday, August 26, 2010
Prayer Shawls (Denise)
I finished the prayer shawls I took to my Women's Retreat.
The dusky rose has a home with Carolyn in Billings.
The blue and green is headed to Shirley in Absarokee, MT.
I used a fringe twister to twist the fringe. It made the work go so much faster. Conair no longer makes these things, but they can still be found lurking around e-Bay and the internet.
The dusky rose has a home with Carolyn in Billings.

The blue and green is headed to Shirley in Absarokee, MT.

I used a fringe twister
 to twist the fringe. It made the work go so much faster. Conair no longer makes these things, but they can still be found lurking around e-Bay and the internet.
Tuesday, August 17, 2010
Fiber Arts Judging Class I & II (NwRSA)
MAWS is providing a Judging Instruction Part I and II seminar through NwRSA on October 1-3, 2010. The class starts 8 am on October 1-3.
I have group rate rooms with the Elkhorn Inn in Montana City, MT, (1 Jackson Creek Road) for the seminar. Rate is $65 (+ tax) for the two nights that span October 1-3 that we meet for the class. Each attendee is responsible for reserving and paying for their own rooms. The number is 1-406-442-6625. Tell them “MAWS Event” to get the group rate.
Our first meeting day will be in the Elkhorn Inn Conference Room. Coffee and cookies are provided. After that, we meet at Montana City Schools.
The cost of the program is $140 per person if I receive money by September 18. After that, it costs $155.
Checks need to be made out to:
Great Falls Spinners & Weavers Guild
65 Treasure State Drive, Great Falls, MT 59404
If you have questions, call me at 406-868-1930…or email meagi1@bresnan.net (meagi one)
Sunday, August 8, 2010
Fair Time (Denise)
All went well at the fair. I entered in about 10 items. I made back a bit more than I spent. That is the goal.
 I took a class on boundweave. Boundweave is set up on wide spaced warp threads on a 4 or 6 heddle loom. I used 8/3 linen rug warp at 6 ends per inch (epi). Using a 2-2 twill pattern for the beginning and ending, I created the sampler pattern. It just depends on what colors you shoot across. The twill pattern progresses in the same order, the colors just change. 4 shots = one color row. Logically this is ideal for rugs. The center part is figurative boundweave (you can see figures). That is woven on a 1-3 twill. The same principle applies, the colors make the pattern, not the weaving.
 My dad's sweater took second because of the neckline. While it was knitted perfectly, I have a line of elastic thread in there. The weight of the garment distorts the sweater. The elastic holds it together. A note in the future - save the elastic till after judging.

My pillow is finally done. using 20/2 cotton thread wasn't wise for a first project on my floor loom. Progress was very slow.
 My drop spindle yarns did well enough. I did them while watching my kids in swimming lessons. The gray Gotland is a bit over-plied. That's why it got the "that's nice" award.
By boucle got second. With more subdued colors it may have done better. Who knows. On to the next!
 I took a class on boundweave. Boundweave is set up on wide spaced warp threads on a 4 or 6 heddle loom. I used 8/3 linen rug warp at 6 ends per inch (epi). Using a 2-2 twill pattern for the beginning and ending, I created the sampler pattern. It just depends on what colors you shoot across. The twill pattern progresses in the same order, the colors just change. 4 shots = one color row. Logically this is ideal for rugs. The center part is figurative boundweave (you can see figures). That is woven on a 1-3 twill. The same principle applies, the colors make the pattern, not the weaving.
 My dad's sweater took second because of the neckline. While it was knitted perfectly, I have a line of elastic thread in there. The weight of the garment distorts the sweater. The elastic holds it together. A note in the future - save the elastic till after judging.
My pillow is finally done. using 20/2 cotton thread wasn't wise for a first project on my floor loom. Progress was very slow.
 My drop spindle yarns did well enough. I did them while watching my kids in swimming lessons. The gray Gotland is a bit over-plied. That's why it got the "that's nice" award.
By boucle got second. With more subdued colors it may have done better. Who knows. On to the next!
Sunday, July 25, 2010
Dyeing Day at Lisa's (Denise)
It was a lovely hot and dry day with little wind. Perfect for solar dyeing. We got started at a nice leisurely pace that seemed appropriate for the sunny Saturday. After setting everything out to cook, we ate and drank iced tea.
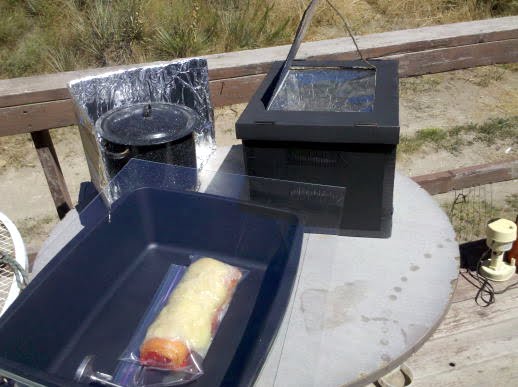
Instead of a long wordy blog, I'll let the photo tell the story with limited dialog. If you have questions, please drop me a line.


Of the three solar ovens, the kitty litter one worked best for the roving. When the Plexiglas was moved to the paper box, that one skyrocketed in temperature. If you aren't sure if the dye all took, just leave it overnight and rinse in the morning...if you can wait that long.
Instead of a long wordy blog, I'll let the photo tell the story with limited dialog. If you have questions, please drop me a line.



Of the three solar ovens, the kitty litter one worked best for the roving. When the Plexiglas was moved to the paper box, that one skyrocketed in temperature. If you aren't sure if the dye all took, just leave it overnight and rinse in the morning...if you can wait that long.
Wednesday, July 21, 2010
Mobius Cast On
Holy Cow!! I've got it!! How I love YouTube.
After being shown this technique and told how easy it is so many times and not getting it, I gave up. I found this video clip about how to do the Mobius Cast On and watched it over and over again. I even got out my needles and practiced it with the video playing. I am successful at this funky cast on now.
Cat Bordhi takes you through 9:52. "This tutorial will take you through the Moebius Cast-On (MCO) and first round of Moebius knitting, as taught in [her] two books on the subject: A TREASURY OF MAGICAL KNITTING and A SECOND TREASURY OF MAGICAL KNITTING."
After being shown this technique and told how easy it is so many times and not getting it, I gave up. I found this video clip about how to do the Mobius Cast On and watched it over and over again. I even got out my needles and practiced it with the video playing. I am successful at this funky cast on now.
Cat Bordhi takes you through 9:52. "This tutorial will take you through the Moebius Cast-On (MCO) and first round of Moebius knitting, as taught in [her] two books on the subject: A TREASURY OF MAGICAL KNITTING and A SECOND TREASURY OF MAGICAL KNITTING."
Subscribe to:
Posts (Atom)
